
ARTICLES
The past two years have profoundly changed the way I shoot outdoor images. I continually look for better methods to improve my photographic techniques, and fortunately, new approaches steadily become evident. While I did well academically in college, the best thing I acquired was a passion for learning. Nobody is more thrilled than I to figure out better ways to shoot images, and I am always willing to share what I discover with others. This article started out as, The Top Ten Changes to my Photography, but this list continuously grows. Wow, what a period of discovery! I hope this list and the short explanations help you uncover new directions in your photography.
1) Canon Digital Photo Professional 4
I love to push camera technology to make it produce the images I see in-camera. I have never relied on software to create new images and still don’t have Lightroom or Photoshop installed on my computer. I did try the free software that is bundled with new Canon cameras, but have been previously unimpressed until I saw what Canon’s Digital Photo Professional (DPP 4) can do. DPP 4 is a huge upgrade over all previous versions. Now I eagerly and efficiently process my RAW images with DPP 4 and actually enjoy it. I love how simple it is to adjust the shadows and highlights, correct for noise, change individual colors for brightness or saturation, sharpen, crop, level or tilt the horizon in the image, remove extra catch lights from a hummingbird’s eye, and so much more.
Not only that, but I once used PhotoMechanic to view my images first to decide what I want to keep, and delete the rest. Now I find the QuickCheck feature in DPP 4 works better for deciding what images to keep. It is so simple. I select a group of similar images that have been downloaded to an external hard drive. Then I select QuickCheck and blow the images up to 100% to check for sharpness. Any image that looks great compositionally and is sharp gets checked by merely pressing the #1 on my computer keyboard. Once I have gone through the set of images, I exit QuickCheck and then delete all the images in the set that did not get a #1. By doing it this way, I can run an initial screening of 1000 hummingbird images in less than an hour. My goal is to keep only the very best, or bad ones for teaching purposes, and delete everything else which often is 95% or more. I am a ruthless editor who values free space on my hard drives.
2) Leave a Prop or Feeder Tube in the Image
For most of my career, I carefully composed and set up the scene to eliminate any prop or bird food I might be using. Now that I can quickly stamp out a sugar water feeding tube, wayward bird seeds, or bird excrement, I don’t worry about these things so much. I use the Copy Stamp Tool in DPP 4 to copy an area next to the offending object and stamp it out.
3) Shoot RAW Only
I once used to set my camera to simultaneously capture a large JPEG and a large RAW file. I used the JPEG when I needed to show the images to workshop clients immediately. Now that I use and enjoy processing with DPP 4, I shoot large RAW files exclusively, and process only the images I wish to show into a high-quality JPEG. Shooting RAW only, reduces the chance of filling the camera’s buffer, which allows more consecutive images to be shot and stored on the memory card. Now the only time I shoot a JPEG and a RAW at the same time occurs when I might be photographing people and I need the JPEGs immediately to give to the people so they can decide what images they like. If I shot only RAW, most people would have a difficult time viewing them.
4) Auto WB
Because I formerly shot JPEG and RAW, I usually set the white balance to match the prevailing light. While I still do this sometimes—such as when using only flash to light the subject or the Milky Way—I now leave the setting at Auto white balance most of the time. With a RAW file, it is easy enough to adjust the white balance after the fact with no loss of quality. By using Auto WB, there is one less thing that must be monitored and adjusted.
5) Picture Style
Canon provides many Picture Styles—Neutral, Standard, Landscape, Portrait, Faithful, Auto—that can be set which send instructions to the camera about how the embedded JPEG in a RAW file or a JPEG alone should be processed in-camera. For example, the picture style Landscape enhances blues and greens and sharpens the image. I commonly used the Landscape picture style because my JPEG images and renderings of the RAW data look great on the computer monitor and the camera LCD. Now that I process my RAW images, I have returned to the Standard picture style, which is far less colorful. The histogram highlight alert is more accurate with the less embellished Standard picture style.
I did adjust the Standard picture style slightly. When I review my images to decide whether to keep or delete them, I like to check the sharpness by enlarging the image to 100% using DPP 4 with the Quick Check display. In the default setting, the truly sharp images look somewhat sharp and the unsharp ones look soft. I find it easier to view sharp images that look really tack sharp, so I customized the Standard Picture Style by increasing the in-camera sharpening a couple of notches. Now sharp images appear tack sharp on the computer monitor. Therefore, I no longer need to guess if the image is truly sharp or not when doing the initial sharpness screening in the Quick Check of DPP4.
By the way, all of my editing software allows me to assign stars or number values to the images. I suppose using a rating system helps many photographers, but I tend to be a ruthless editor and I only need two categories. Either the image is excellent and I keep it, or I delete it. I do, however, save some flawed images to use for teaching purposes. My thought is, if I have a few five starred images of a canvasback duck, will I ever you any images of it that aren’t quite as good and therefore assigned four or three stars? I doubt it!
6) Shoot Looser to Allow Cropping
I was trained to consider a 35mm slide as my complete canvas, so I compose accordingly and never plan to crop the image. Shooting tight was, indeed, a difficult habit to break, but hummingbirds ultimately forced me to do it. All too often when I compose hovering hummingbirds tightly, the best pose always seems to have a wing tip or tail chopped off in the image. By shooting a little looser, there is a much
better chance to capture spectacular poses without cutting out any crucial picture elements. Typically I shoot approximately twenty per cent looser than what I actually want, but then I easily crop the image somewhat to get the composition I envision.
Don’t overdo shooting too loose, though. Some of my Kenya clients stop the vehicle to photograph birds that are truly way too far away, and thus lose valuable time that could be more productively spent with closer and more photogenic wildlife. I sometimes joke, “You need more than five pixels on the subject!” On a recent safari, one client showed me a huge blowup of a baby lion. When I asked to see the lion cub in the original image, I literally could not find it. The photographer said the lion cub was hidden underneath a single red AF point. I think that is shooting way too loose!
7) The Canon 200-400mm lens with built-in 1.4x teleconverter is incredible
I have only owned this lens since 2014 and find it to be indispensable. It is especially valuable on Kenya safaris’ where you are confined to a landrover, or in stationary photographic blinds. I now use this lens for hummingbird photography. Initially, I thought I would set the zoom to 400mm and place the lens at the absolute closest focusing distance for the smaller hummingbirds. Should two hummingbirds arrive at the sugar water feeder setup simultaneously, or a larger species arrives, then I could quickly zoom the lens to perhaps only 350mm to accommodate the larger subject size. In practice, though, I found setting the zoom to 400mm and placing the camera at the distance where the large species looks good, and just flip the switch to insert the internal 1.4x teleconverter when a smaller species is present is more efficient.
Using the built-in teleconverter does not change the exposure even when the aperture is closed down to f/18. I just ran a test while writing this paragraph. In many ways, my home is like a photography science lab since I frequently run tests. I set the exposure to manual and the lens to f/4, the biggest aperture on the lens. I photographed the lawn without the internal teleconverter in use and got a neutral exposure. The exposure was one stop darker with the teleconverter in use. However, when stopped down by a stop or more—such as f/16—you can use manual exposure because the camera is quite intelligent and adjusts the aperture size to negate the light being absorbed by the teleconverter. Stopping the lens down to f/5.6 or smaller keeps the exposure the same—no matter if the teleconverter is in use or not.
For this same reason, all of the variable aperture lenses I own don’t literally vary the exposure no matter what focal length they are zoomed to as long as I am shooting at least one stop smaller than the largest aperture on the lens.
8) The 800mm Lens is Incredibly Useful
I cherish my Canon 800mm f/5.6 telephoto lens. The working distance it provides for photographing wary subjects is hugely appreciated. With my Canon 1DX Mark II, it is so much easier to capture large images of birds from the window mount in my car or floating blind. Though I have only had the lens since 2015, it is a lens that I use over and over. It is actually smaller than the Canon 600mm f/4, and painless to carry and pack—at least to me. I always take it when I lead Alaska bear photo safaris and love it for photographing the many smaller birds and mammals in Kenya’s wildlife parks. It is a lens I wish I had been using my entire career. Everything is so much easier now. It is way better than the 500mm lens I used most of my career! I know some of you don’t want to hear this because 800mm lenses are expensive, but I would not be without mine! Of course, if you use a camera with a smaller
sensor, such as the Canon 7D Mark II with a 1.6x crop factor, a 500mm lens is like the 800mm lens as it gives a similar field of view.
9) Floating Blinds are Awesome
My favorite kind of bird photography (by far) is stalking water birds inside my floating blind. A Wimberley gimbal head is mounted on the bow of my blind that is covered with camo fabric. I wear chest waders and carefully climb through the hole in the center of the blind so I can walk on the bottom of the pond or lake in shallow water where most of the subjects dwell. The blind is buoyant enough that should I step into deep water, the blind easily keeps everything afloat.
During June and July, I was in the blind about thirty times at dawn on Henry’s Lake where I live. On calm mornings, I often have ten to fifteen different subjects to photograph—mainly birds, but I did get some images of a mink hunting the shoreline and a moose swimming past. On a good morning, I shoot about 3,000 images in two hours! Photographing in a floating blind could wear out a camera quickly as on one productive morning, I shot 128GB’s of images in 1.5 hours! For years I wanted to photograph cinnamon teal. On the first two mornings, the pair of cinnamon teal were a little skeptical of my “drifting muskrat house”, so they swam away as I approached and kept just out of range. Eventually, over several mornings, they became accustomed to my “muskrat house” and accepted it. What a pleasure it was to have a pair of truly wild cinnamon teal feed, preen, bathe, and sleep right in front of me for more than an hour without a care in the world. Eventually, I left them to pursue buffleheads, but only after shooting 2000 cinnamon teal images! Wow!
To view many images shot in my floating blind, and some images of the floating blind along with key measurements, go to www.dpreview. Search the site for floating blind and Gerlach to view a few threads I started on the topic in the NATURE AND WILDLIFE PHOTOGRAPHY forum.
10) The Level in the viewfinder is a must have Feature
The Canon 7D Mark II is the first camera I have used where a level in the viewfinder can be activated and utilized. For years I have wanted this feature and finally it is a reality. To shoot landscapes, I habitually use the LCD virtual horizon level. However, when photographing wildlife where I am peering through the viewfinder, the virtual horizon or any level attached to the camera hot shoe doesn’t help. Now I can see in the viewfinder when the image is level. I find the level in the camera’s viewfinder is incredibly helpful when using my floating blind because it is a bit cramped inside making it difficult to squarely peer through the viewfinder, which caused many tilted images. I realize images can be leveled with software, including DPP 4, but it is preferable to make the image level when you shoot it!
11) Use Multiple Exposure to Fire Flashes Multiple Times
Using the multiple exposure function allows me to fire one or more flashes up to nine times at full power to light distant objects, large objects, or multiple objects. I commonly use four Canon 600EX-RT Speedlites simultaneously to light a landscape’s foreground. To aim the Speedlites, I mount three Speedlites on three small light stands, each with a tiny ball head on top to allow pointing the Speedlites. The fourth Speedlite is held in my hand and carefully pointed where its light looks the best. I use the Speedlites radio release (REL) button to fire the camera remotely. This REL button works when I am fifty yards from the tripod-mounted camera.
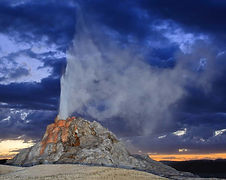
12) Geysers at Night
It is truly rewarding to photograph Yellowstone’s geysers on dark clear nights. Using flash or a flashlight to illuminate the geyser cone and steam is effective, especially when the background is the starry night sky. Although most of the time I have the geyser to myself, night photography is becoming increasingly popular. Signal interference could become a problem because if two photographers want to shoot the geyser using different lighting schemes, it won’t work during the typical brief time the geyser erupts. To learn nighttime geyser photography, start with geysers that erupt often, such as White Dome (two to three times per hour), Jewel (about every ten minutes), or Clepsydra (continuously erupts).
13) Light Paint with a Flashlight
Using a flashlight to add light to the scene works well once the exposure extends into the seconds. It takes some time to light paint an old cabin, for example, so you will need several seconds. Of course, when photographing the stars, exposures around twenty seconds are commonplace, so flashlights are adequate for light painting. Learn to light paint by trial and error. It only takes a few tries before you get zeroed in on the amount of light painting that must be done. Don’t forget, it is also possible to combine light from flash and flashlights in a single image. I do this a lot. If I want the interior of an old cabin to emits a soft warm glow, I put a Canon 600EX-RT Speedlite that is filtered with a full CTO gel inside the cabin. When I shoot the long exposure, the camera fires the flash to light the interior, and I use a flashlight to paint the outside of the cabin with light.
14) Gel the Flashlight or Flash
The color of light from a flashlight can vary with the model and the bulb. The light from a flash typically resembles midday sunshine. Often I prefer a warmer light source than offered by either my flashlight or my Speedlites. It is easy to use gels over the light to modify the color. I am a huge fan of the Honl flash accessories. I have their speed strap on all of my Speedlites and own two sets of their warming filters (CTO – Color Temperature Orange) that come in various strengths that include 1/8, 1/4, 1/2, 3/4, and Full. Velcro strips attached to two sides of the gel filter permit quick fastening to the Velcro on the Speed straps. Often the foreground in the landscape benefits considerably from the warmer toned light emitted by a flashlight or flash suitably equipped with a gel. In close-up photography, I commonly use a Full CTO on my main flash to add a warm color cast to the subject while leaving the background with cooler tones. I know you can add yellow to the image with software, but the background color also changes unless you know how to isolate only the subject with software. It is much easier and quicker to warm the colors of the subject with a gelled flash while shooting the image.
15) Seek Dark Cloudy Days for Landscapes
I once considered dismal cloudy days as not especially suitable for landscape photography. Not anymore! I love the dark gray, threatening skies, but would prefer to have a brighter warmer light in the foreground. Anytime the sun peaks through the clouds, I have a chance for a spectacular image. Of course, on those thoroughly socked in gray days, spectacular light usually doesn’t happen. But, no worries because I have the sun in my camera bag. Now I often gel the Speedlite with a 1/2, 3/4, or Full CTO filter and light up the foreground with gorgeous golden light from the Speedlite—which I think of as my “sun in the box.” Often I underexpose the ambient light a stop to darken those gray skies still more for dramatic images. It works so well! Give it a try. Here’s what you need to get started: 1 Honl Speed
Strap for every flash, set of CTO warming filters, and a Filter Roll-up holder for quickly using the filters in the field—total cost is about $40.
16) Wireless Radio Speedlites Work Better than Optical
I tend to be suspicious of anything new. When Canon announced their first radio Speedlite—Canon 600EX-RT—I had to try it. Seriously, I did not think it could radically change the way I use flash. Now, having used the radio-controlled Speedlites for a couple of years, I will never go back to optical wireless control. The radio signal works over much greater distances, doesn’t require line-of-sight between the transmitter and the receiver, and always works flawlessly. With optical, I continually had problems while using flash when hidden in a blind because the fabric blocks the signal. I solved that problem by attaching a dedicated Canon flash cable to the hot shoe and the other end to the Canon ST-E2 optical only controller and duct taping the unit to the lens hood that was outside the blind. What a chore that was! Even when photographing hummingbirds where a hide isn’t needed, shooting a vertical composition meant the ST-E2 is blocked by the arm of the Wimberley Sidekick I like to use and that often prevented the signal from reaching one or more of the slave Speedlites. By using radio, obstacles are no longer a worry. Yeah!
17) Focus Stacking
I have been a huge fan of focus stacking for a few years. Using f/8 because it is likely the sharpest aperture on your lens, start at the closest point that you want in sharp focus in the scene—macro or landscape or anything that holds still and shoot slices of the scene as you focus slightly further into the scene. Focus stacking is the most powerful tool to become available during my forty year career! Focus stacking is not only the ultimate in getting the maximum sharpness in an image, but it is also superb for selective focus. In a whole patch of wildflowers, you could shoot through the flowers and isolate one blossom. Set the lens to the maximum aperture—perhaps f/2.8 or f/4, and stack your way through a single blossom. One blossom is incredibly sharp and everything else is wonderfully out of focus!
18) Use 1/64th Speedlite Power to Motor Drive Hummingbirds
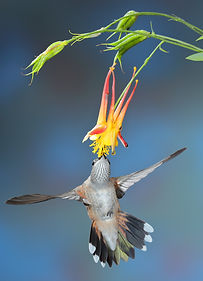
For years, I used Sunpak 544 flashes in the hummingbird photo workshops I teach. They work well, especially wired together so any camera system can use them as long as there is a PC terminal on the camera. However, I formerly used optical wireless Canon 580 Speedlites for my personal shooting and now use a set of four Canon 600EX-RT Speedlites along with the ST-E3-RT radio controller. Wireless is so agreeable to work with and quicker to set up. To freeze the wings of a rapidly beating hummingbird, I require the short flash duration found at 1/16 power. I found that I could shoot about three images rapidly before the flash began to underexpose the hummingbird because the batteries could not recharge the capacitor fast enough. During my hugely popular hummingbird workshops in British Columbia (and now Ecuador), I decided to see how many rapid-fire images I could shoot and properly expose with the new Canon 7D Mark II that delivers ten images per second. I was using a set of four Canon 600EX-RT Speedlites and controlling them with the hot shoe mounted ST-E3-RT radio controller. Since I could zoom the flash head to 200mm, which concentrates the light, I decided to try using 1/32nd power, not to freeze the wings more, but to use less energy to see if I could shoot more images before the power stored in the capacitor fails. Using high-quality rechargeable batteries (Eneloop and Powerex 2700), I found I could shoot 10-12 images in slightly more than one second before the Canon 600EX-RT Speedlites got behind in power and failed to fire. Shooting twelve optimally exposed images in a mere 1.2 seconds is impressive, and I caught many interesting hummingbird poses that I fail to get when shooting fewer images per second. Always one to push the photo boundaries, I wondered what would happen if I moved the Speedlites still closer to the hummingbird –about ten inches away more or less and increased the ISO to 400—and used 1/64th power. How many images could I shoot at ten images per second before the Speedlites got behind? With one particularly hungry black-chinned hummingbird, I shot about 25 images before the camera quit shooting. The Speedlites optimally exposed every shot and always kept up. The only thing that stopped me was the camera’s buffer that filled to capacity. Once that happened, the shooting speed slowed considerably because the camera could not fire a shot until enough data was written to the CF card to allow another exposure. But, twenty-five shots in 2.5 seconds is astounding, and I wasn’t even using special battery packs. I merely used four full-charged AA batteries in the flash. During the next two hours, I proceeded to shoot 2500 images. Talk about an editing nightmare, not to mention that you could wear out the camera’s shutter in a week at this rate. I don’t need to shoot that fast with the abundance of hummingbirds frequenting the Bull River Guest Ranch, but other places where you might only get a few hummingbird visits per hour would benefit tremendously from the fast shooting speed.
Since running these tests, I have found I can only shoot at nine images per second. If I go for ten images with my new Canon 1DX Mark II, only the first image is exposed, and then the flash does not fire again. Apparently, the electrical system can’t keep up when shooting ten or more images per second. But, nine images per second is more than adequate.
By the way, don’t use automatic flash metering for hummingbirds – use manual. I tried TTL flash metering and the shooting speed falls considerably. Why? With manual flash exposure, the master or commander flash controllers tells the flashes to fire and they do. With automatic flash, the controller tells the flash to fire, and the flash first fires the preflash and uses the data from the light that returns to set the exposure by running a lot of calculations, and then fires the primary flash to expose the hummingbird. Although this sequence happens fast, and we can only detect one flash, it does slow the shooting speed considerably to about half of manual flash!
19) How to Use a Set of Wireless Speedlites with all Camera Systems
For years I sought to use wireless setups and Canon or Nikon flashes that allow zooming the flash head in my hummingbird photo workshops, but could never find a reasonable way to do it. Should I restrict all clients to only the ones using Canon or Nikon? Should I use PocketWizards on six cameras and twenty some flashes at one time? That would be expensive and require still more batteries. I could wire everything together like I do the Sunpak, but I want to get away from the unreliability of wires, especially when dozens are in use at the same time. I can’t use optical slaves because the hummer stations are so close that anyone shooting a shot would fire every flash on the ranch. What to do?
In 2016, one of my favorite clients – Scott (I can build anything) Bechtel – brought his own set of Yongnuo YN560-IV Speedlites and fired them with a hot shoe mounted Yongnuo YN560-TX Manual Flash Controller. There is no through-the-lens flash metering, but that isn’t necessary for hummingbirds anyway. The Speedlite is generic for any camera system. He had a flash controller for Nikon that gives you a couple of features, but it worked just fine on my Canon camera for firing the Speedlites.
Apparently, the center-pin that tells the flash to fire is standard on camera hot shoes, so the controller is supposed to work with any camera. And the price is incredible. For the cost of one Canon 600EX-RT, you can buy a Yongnuo Manual Flash Controller and six Yongnuo Speedlites. I bought a set of Yongnuoflashes and used them intensively during June and July at my Idaho home for hummingbirds and they worked flawlessly!
I led a hummingbird photo tour in Ecuador during February of 2017. We used all sets of Yongnuo YN560-IV Speedlites and fired them with Canon Yongnuo YN560-TX Manual flash controllers with radio signals. Everything worked fine with both Canon and the Nikon cameras in the group. It appears this manual system will work with any camera that has a hot shoe for the controller. That is tremendous news! All I needed to do was set a custom function on the flash to prevent it from going yo "sleep." Apparently, a Canon designated controller can be woke up with a Canon camera, but not other brands. Forcing the flash to remain on solved the "sleep mode" for Nikon.
20) Use Hummingbird Buttons for Better Bird Control
A hummingbird button is a tiny plastic sugar water container with a yellow flower on top of it. It is made so folks can fill it with sugar water, hold it in their hand, and have hummingbirds feed out of their hand. Since it is tiny, it is easy to hide in or behind a flower blossom. Hummingbirds are readily attracted to the yellow plastic flower and you have a clear view above and to the left and right of the hum button. I just tried it at my home in Idaho and it works wonderfully well. I am now getting entirely new angles of the hummingbirds as they hover above the button or feed in it. When disguised with a flower, it appears the hummingbird is feeding in the flower, not the hum button directly behind or inside the blossom.
21) I am Starting to Use Autofocus on the Shutter Button More Often
I am huge fan of back-button focusing and have been for at least twenty years. Even top-of-the-line film cameras offered BBF. Back-button focusing is a way of controlling autofocus by separating the focus control from the shutter button. However, now that cameras have so many quality AF points to use, and it is quick and easy to select the AF point I want, I am frequently putting the autofocus back on the shutter button and merely selecting a single AF point that corresponds to the exact spot where I want sharp focus. When photographing swimming ducks or grebes in my floating blind, it is a bit cramped to use back-button focusing. Instead, I use front button continuous autofocus and simply keep changing the focus point to correspond with the bird’s head. I still use back-button focusing most of the time, especially for landscapes, but I use front button focusing about half of the time for wildlife photography. Both methods work, but neither is optimum all of the time.
I just returned from leading my 42nd photo tour to the incredible game parks of Kenya. As always, it was over the top for wildlife photo opportunities. One of my clients – D.C. – said his Sony did not allow BBF, but he could use the rear button that is normally used for BBF on most cameras to actually lock autofocus when pressed in while shooting. I was well aware that all of my Canon cameras also allow for this option, so why not try it in Kenya? Starting at Lake Nakuru, I set my camera to high-speed shooting to permit the camera to shoot as many images per second as possible and kept the autofocus on AI Servo or continuous autofocus to enable the camera to stay focused on moving animals. I removed the autofocus control from the rear buttons on the back of the camera and put it back on the shutter button, which is the default option. I then went into the custom menu and set both the Star button and the AF-On button to AF lock. Most of the time when shooting, I simply move a single AF point to the head of the subject and press the shutter button down half way to make the camera autofocus on the head. However, there are times when no selectable AF point coincides with the head of the animal when the composition I want is made, so I point the single active AF point at the head of the animal, press the shutter button down half-way until focus is achieved, and then press either the Star or AF-On button (remember I programmed both button to do the same thing) and hold it in while shooting to keep the focus locked. Of course, once focus is locked, I recomposed to best advantage. I suppose I can now call those buttons BBLF for back-button lock focusing. It worked perfectly and I continued to use autofocus in this manner for the remainder of the safari and into the future for now. Any time action photography is being done, this is a most workable system. Naturally, I would not use it for landscapes where I don’t want to be touching the camera while shooting on a tripod with slow shutter speeds.
22) Use the Highlight Alert more to Optimize the Exposure
I am an advocate of ETTR (exposing to the right) when I shoot RAW images. Now I shoot only RAW images for outdoor photographs, therefore it is important to get the rightmost data over to the right wall of the histogram. This preserves highlight detail, captures plenty of image data that is needed when making significant adjustments to the image with the software, and reduces noise in the shadows. However, it is often difficult to see when the rightmost data begins to climb the right wall, especially in bright ambient light. The flashing highlights (‘blinkies”) are much easier to see and now I use them more than the histogram.
The vast majority of photographers insist that allowing data to climb the right wall of the histogram means important highlights with detail are overexposed, and this detail is lost. In reality, this widely held belief isn’t necessarily true. If you shoot RAW images only, how is it that you see the image on the camera’s LCD? All RAW files have an embedded JPEG to allow the image to be seen. Both the histogram and the highlight alert are based on this in-camera produced JPEG. When the JPEG is created, the camera sharpens and adjusts the color as set in the camera. This in-camera processing tends to cause the camera to indicate overexposure by running data up the right wall of the histogram and making the flashing highlights appear before the RAW data is actually overexposed. With my Canon 7D Mark II and the 5D Mark III, I can add another stop of light once my flashing highlights first appear without actually overexposing the highlights. So now I just keep adding exposure until the flashing highlights—commonly called “blinkies”—appear and use that for my exposure.
I will bet your camera also lets you expose more than you think without overexposing the RAW data. Try this test! Photograph a medium-toned subject with detail under diffused light. Expose until you get the first flashing highlights and mark the image number down. Then keep adding light in 1/3-stop increments up to a full three stops of light. Open the files with your RAW processing software and find the image where data finally climbs the right wall of the histogram that is presented by the software. If
you touch the right wall using an exposure 1.3 stops past where the blinkies first appeared, it means you can add a full stop of exposure once you see the first blinking highlights!
23) Using Live View More for Landscapes
I am finding I use live view more when shooting landscapes because my Canon cameras offer a live histogram in the live view mode. This is a histogram that appears on the LCD before the image is shot. I find it is a simple matter to adjust my exposure controls using Manual exposure to move the rightmost histogram data over to the right wall of the display, shoot the image, and see if any blinkies appear in the image. If too many, I cut the exposure down a little and shoot another image. If no blinkies appear, I add light usually by slowing down the shutter speed and shoot another image, when I get my first blinkies, I use that as my final exposure because I know when blinkies first appear, that portion of the image where the blinkies appear is truly not overexposed in the RAW data, but rather is it just a result of the JPEG being made in-camera from the RAW data.
24) Set up Your Exposure controls and the metering scale in the viewfinder to make sense
I have done this for years, but I know I must remind everyone to do this. Adding light moves the histogram data to the right. It makes sense to set your camera so turning the shutter speed or aperture dial to the right (as viewed from camera rear) also adds light and moves the histogram data right.
Unfortunately, the default setting on every camera I have seen has the dials reversed! To move histogram data right by adding light, you must turn your dials left as seen from camera rear. Most cameras allow you to set the dials to do the opposite. For example, with Canon cameras, look for a menu choice called “Reverse Dial Direction TV/AV”. Setting this options effectively reverses your dial direction to be more intuitive. Nikon normally allows you to reverse dial direction too. And if your exposure scale in the viewfinder has negative on the right and positive on the left, normally there is a menu option to reverse this too. Many Nikon’s need to have their metering scale reversed to make more sense.
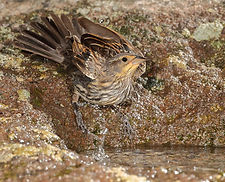
25) Water Drips for Birds
Most birds readily visit fresh water. The sounds of dripping water attracts birds far better than I expected. For two years, I have dripped water into a natural cavity in a large boulder near my home and photographed at least two dozen species at the drip, including several species that I could not find a way to photograph in any other way. Wilson’s warblers are common migrants in my yard during September, but they are not attracted to bird food. However, dripping water brought then right in so now I have plenty of images of this gorgeous yellow warbler with the black cap on the male’s head. And while I was photographing a Wilson’s warbler, it suddenly flew away. As I continued to peer through my viewfinder, another warbler took its place, but it was not a Wilson’s. Instead, a gorgeous Townsend’s warbler filled my viewfinder and let me capture many images. This was a special treat as I had never seen this species before. Wow, imagine being an avid birder and seeing a new species for the very first time through the viewfinder! It is a sight I will never forget, and I did know what it was immediately as I had been wondering why I had never seen on as I live where they are found. And a week later, I got one more chance to photograph another Townsend’s warbler.
Embrace Change
Camera technology is changing so fast and for the better. Always keep your mind open to new opportunities and be willing to evolve in order to acquire new and better shooting strategies that will surely help you capture memorable images.


Important Changes to My Photo Strategies
By John Gerlach
My most recent images are posted on Facebook and Flickr