


Sunrise at Muscatatuck National Wildlife Refuge
- John Gerlach

- Aug 11, 2018
- 8 min read
Sunrise at Muscatatuck National Wildlife Refuge
by John Gerlach
Canada geese are a blessing when they hold still, but they do make waves when feeding!


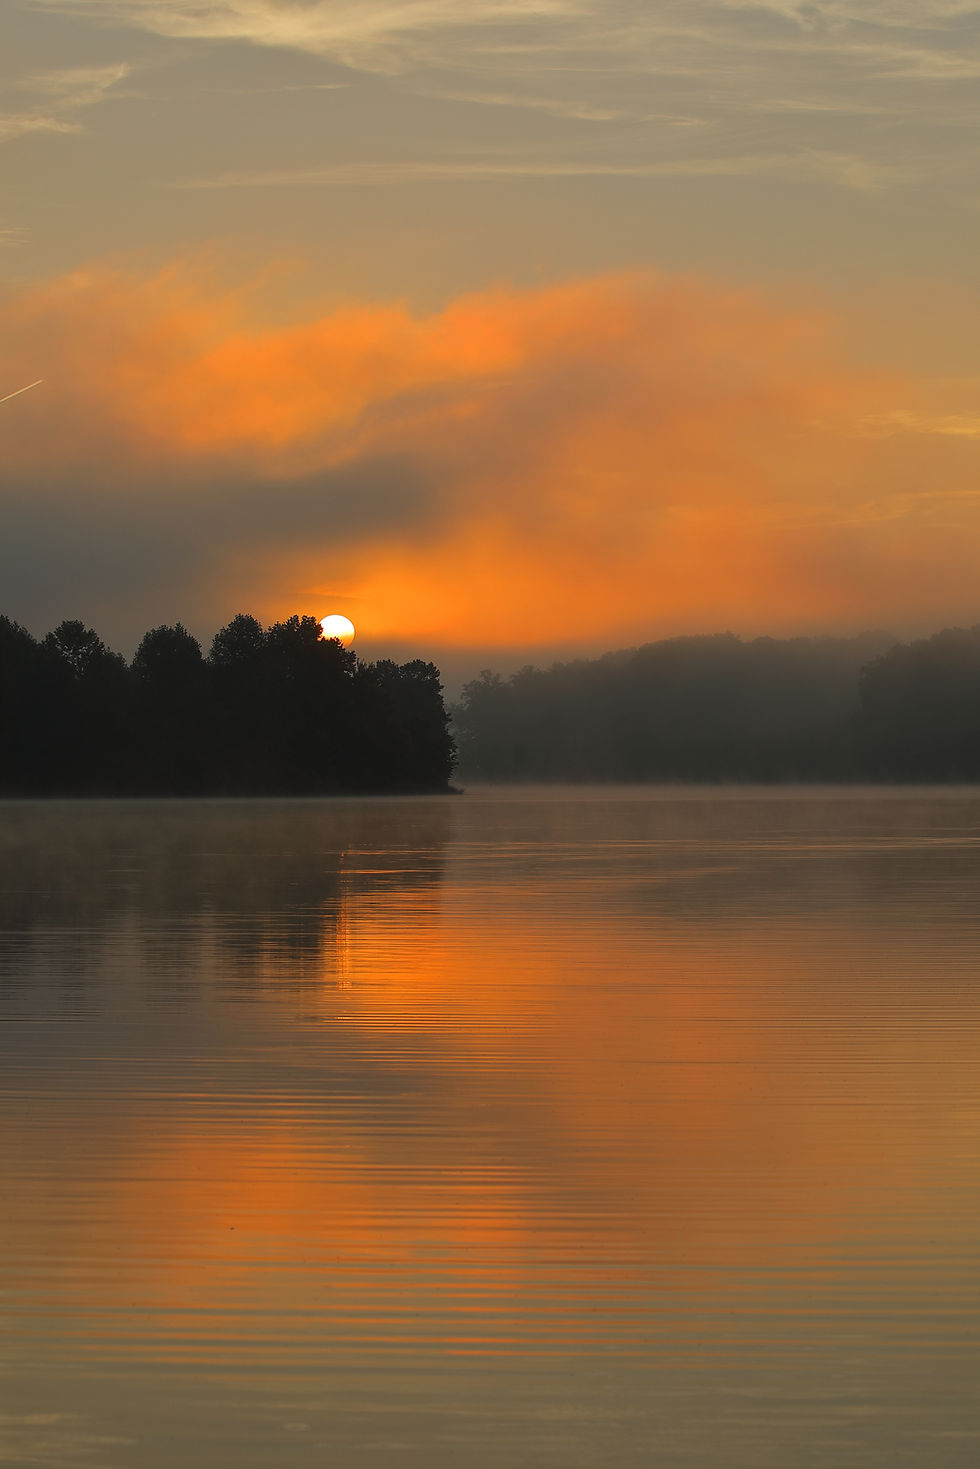
Muscatatuck NWR is a few miles east of Seymour, IN. It contains many marshes and small lakes that attract lots of birds and is a major breeding ground for wood ducks. And it is a well-known place for river otters, though, I have yet to meet one (I continue to hope). Since the lakes are small and surrounded by dense forests, and it seems to be a less windy area anyway, the lakes have been perfectly calm every time I visit at dawn. Outside of one morning when twenty unruly visitors created waves in the lake, it has been easy to capture mirror reflections of the scene at sunrise. And the visitors were Canada geese, so being a wildlife refuge, they must be appreciated nonetheless!
So far, I have visited the lake at least ten mornings for sunrise shots, and every morning has been unique! It pays to return to good places over and over to enjoy the variety of photographs offered. The sunrise colors have been different each morning in terms of how much and where they appear. Sometimes color is fleeting, and sometimes it lasts quite a long time, so you do need to be quick with camera gear for those fleeting periods.

How I Approach the Sunrise
I like reflections, so calm water is highly desirable. The smaller the lake, the more likely it is calm at dawn, especially when surrounded by tall trees that tend to block small breezes. I do like ponds that stretch out east and west to have more water to catch the reflections of the hopefully colored clouds or fog at dawn.
The dawn light is dim, so I always use a tripod to permit me to use ISO 100 and f/8. ISO 100 is the native speed of my Canon 5D Mark IV sensor and delivers the finest RAW files with the fewest artifacts. F/8 is certainly one of the sharpest apertures on my Canon 16-35mm, 24-70mm, and 100-400mm lenses. I normally don’t need to stop down more because the trees on the other side of the lake are already at infinity focus and so are all the reflections of the sky. When I do use a near foreground, then I focus stack the scene using f/8 to cover the depth of field.
Sharpness in the trees on the other side of the lake is important to me. I get sharp results by using superb technique. I use a solid Gitzo tripod like the Gitzo GT4533LS with a Kirk BH-1 ball head on top. Attached to my Canon 5D Mark IV is a Kirk L-plate that provides a quick release on both sides of the L-bracket, making it easy to mount the camera horizontally or vertically on the tripod. Naturally, when using my Canon 100-400mm lens, I use the tripod collar on the lens to attach the lens and camera to the ball head.

Notice how the sun looks similar to the moon as it becomes white in the dense fog. Made at 400mm to make the sun larger.
When working on a tripod, I find it is important to turn image-stabilization off if I have it on my lens. Focusing is easy. While I once used autofocus with back-button controls, I have since learned the error of my ways (autofocus is not as accurate as we are led to believe but improves with AF microadjusting) and now focus manually on the tops of the trees in the distance where I can easily see the silhouetted treetops where they meet the brighter sky. I turn on live view, move the focus box over to the treetops against the sky, magnify the image in the box to 10x, and now it is easy to manually focus on the trees. I trip the camera by using the two-second self-timer along with the Touch Shutter. But, touch shutters are new, and your camera may not have it, so other great ways to fire the camera without touching it include a cable release and wireless release. Lately, when focus stacking, I have been using a PocketWizard Plus X along with a cable from PocketWizard that is made to connect the Plus X to the camera to fire it. It works well, and when I want to shoot the camera remotely, I use a second Plus X and press the TEST button on the Plus X to fire the camera. The Plus X I hold remotely sends a signal to the Plus X attached to the camera with the cable to trip the shutter. It works perfectly, and I really like it when I can’t be near my camera or I am shooting a focus stack.
Exposure
My Canon camera provides a live histogram on my LCD when using live view. Since I have custom set my exposure dials to add light when I turn them clockwise as viewed from camera rear, it is only a matter of turning the shutter speed dial the same direction I want the live histogram data to move. My goal is to have the right-most histogram data just touch the right wall of the histogram, and even climb it a little. For many subjects, I set the exposure, and shoot a test image, to see if a few blinking highlights appear. Often called the “blinkies,” this is a quick way to know when you have a suitable exposure set for RAW files. For JPEGs, I would avoid blinkies in important areas where detail is desirable.
I realize allowing some “blinkies,” and letting a little data climb the rightmost wall of the histogram is frowned upon my many photographers and this notion started at the beginning of digital photography. What has been forgotten is the histogram and the highlight alert produced by the camera are derived from JPEG data files, not RAW files. RAW contains far more information than a JPEG this is based on only 8-bits of data instead of 12-bits or more. I find my cameras can go at least one more stop toward more exposure before overexposing highlights once I see blinkies. So, if I adjust the exposure to produce the first blinkies, or even add another 1/3-stop of light to produce a few more blinkies, I am still good with the exposure. And to be honest, digital has so much latitude that even a poor exposure can be made quite pleasing. Note: I began my career with Kodachrome 25 back in 1974 or thereabouts, and trust me, that film did not tolerate missing the ideal exposure very much. Imagine using ISO 25?
By the way, I have my live histogram set to the RGB histogram that shows a separate histogram for the red, green, and blue color channels. When one color dominates, then you can’t go by the blinkies because a dominate color may be severely overexposed as it takes at least two colors to max out to activate blinkies. So, when photographing sunrise where red is often the dominate color, I monitor the live histogram and make sure the data in the red channel is touching the right wall of the histogram, but not climbing it very much. In this situation, if you add enough light to see blinkies, you may have severely overexposed the reds in the scene.

Composition
I really appreciate live view and use it nearly all the time for landscape and close-up photos. The live histogram and magnifying the live image to manually focus the lens is an enormous aid!!!!! And shooting in live view is crucial to avoid both the DREADED mirror slap and shutter shock problems at the same time. In live view, the mirror is already in the up position to allow light to strike the sensor, and the shutter is open too – so all quiet in the camera – thank goodness!
But, when composing the scene, I really don’t care for looking at the live view image. I find composition is much easier, for me and maybe not you, to look through the viewfinder, compose the shot, and be sure that the scene is level in-the-viewfinder with the level that appears in my viewfinder, and I did have to activate it to see it. Once I have composed the scene and made sure it is level, I lock the tripod head up to secure the composition, and then I turn on live view. This is a matter of preference, I prefer it, but you may be fine composing with live view and using the level that appears on the LCD. There is no wrong way, only two ways of composing the scene and your choice is totally a matter of personal preference.

Arrive Early and Work the Scene
You hope sunrise is spectacular, but so can the sky long before sunrise. Often the eastern sky turns flaming red well before sunrise, so be sure to arrive early at the chosen spot to take advantage of that. At Muscatatuck, the gates open one hour before sunrise, providing time to drive to your spot a few miles away. Watch out for animals on the road, though, such as opossums, rabbits, and white-tailed deer.
Be aware you may get more than one peak moment for color. Sometimes excellent color develops a half-hour before sunrise, then fades, then color develops again right at sunrise, and fades, and then early sunshine can highlight clouds and fog in pleasing ways, so yet a third opportunity to work the light occurs.
Use your lenses. I have used every focal length between 16mm and 400mm for sunrise at Muscatatuck. Typically, I frame areas of the most intense color, or shoot wide-angle shots to include as many clouds and reflections in the shot as possible. I have used my longer lens to isolate a Canada goose standing in the water reflecting dawn’s color, and often use a longer lens when the sun barely rises above the trees to make the sun larger in the image, especially if it is a bright red ball, or when the fog is thicker - a bright white ball.

The trick to making pleasing images is to be at a suitable spot on time and know your photo gear. While I have covered a lot of stuff that I do, I can assure you that most of it is a habit and I do it automatically. With practice, it should take you less than one minute to compose the shot, focus the lens, set the exposure, and capture the image. Your goal is to become familiar enough with your gear that you can perform all of this quickly and easily without making a single wasted motion. Good luck, enjoy the moment, swat a mosquito for me, and make images you cherish and memories you won’t forget.


A spicebush swallowtail was warming up in a field near the lake.

Notice the entrance at the top of this map on the north side. As you enter the refuge, both Richart Lake and Stanfield Lake offer splendid chances for sunrise images. The sun rises in the southeastern portion of the lake. And in fall, I suspect the sun is rising so far south that if you shoot north from the southern side of the lake along the road, you will get nice golden reflections in calm water on many autumn mornings. I haven't been there yet in fall, but hope to see it this year. I have done tons of fall color reflections over the decades. A little tip - timing is everything. If you arrive shortly after sunrise - you are too late. It is best to be at a sunrise location at least 30 minutes before sunrise, and that means being set up and ready to shoot as often a bright red sky happens well before sunrise, then the colors fade, and then the color returns as the first red rays of sunshine strike the clouds and fog. In my case, I am usually at the spot one hour before sunrise, and if you arrive earlier, it is possible to make star images too.

Just a little color is present, but I like how the fog in the trees adds a little mystery to the scene.


Comments