
Foxy Fox Squirrels of Seymour, Indiana
- Nov 30, 2018
- 7 min read

All the exposure data is similar for all the images made on the overcast day. For this image, I used f/6.3, 1/200 second, and ISO 1250. Since I used manual aperture and shutter speed, I set those and the camera selected ISO 1250. Of course, keep in mind I had the EC set to +1, or the camera would have set ISO 625. The +1 EC gives me a one-stop brighter image. I found 1/200 second is about as slow as I can go and the squirrels tend to move their lips a lot.
Seymour, IN has several urban parks and often parks have wildlife that are easy to photograph. Normally I look for parks with ponds where I can photograph waterfowl, but parks without ponds still attract birds, deer, rabbits, and squirrels to photograph. I pulled into Gaiser Park on a cold November day to see if anything is running about. At first, I did not see any birds in the trees or deer on the ground or anything else, but then I noticed eastern fox squirrels foraging for nuts amid the leaves. Soon I was seeing more than a dozen squirrels intently hunting nuts. I thought their hunting strategies were adorable, as they sneak up on a nut and then pounce on it.
Knowing I was after wildlife, I had my favorite camera gear for birds and mammals. My setup is a Canon 1DX Mark II mounted on a Canon 800mm f/5.6 lens. My camera battery is freshly charged, lens cleaned that morning, and a Gitzo GT4533LS supports my Wimberley Gimbal head.

Photo Strategy
I know wildlife prefer that I don't move very much or quickly, so I move very slowly and tend to stay in place a lot allowing them to get used to my presence. Of course, this is a park so the fox squirrels are used to seeing humans moving around and largely ignored me if I did not approach them too closely. With my 800mm lens, I had plenty of working distance where I could photograph them full-frame while they behaved naturally. I also used my Canon 1DX Mark II primarily because it shoots 14 shots per second. I do admit that squirrels tend to hold a pose for quite a while so you normally don't need to shoot at that speed, but once in a while, a pose or action shot is brief and that is where shooting so fast is really helpful. And with this camera/lens combo, I have my AF microadjustment set to -3 to correct a small amount of back focusing.

A word about AF microadjusting the lens/camera combination. When I report that mine needs a correction, some photographers suggest I send it back to the maker to get it fixed. Actually, there are tolerances built-in to the manufacturing of this equipment and having some slight focus adjustment is normal and to be expected. A -3 correction is tiny, but noticeable if you run a focus test like I have previously explained in another blog. It is comforting to me to achieve the sharpest possible RAW files that I can, and then go from there in processing the RAW image. I have AF microadjusted every Canon lens I use with autofocus, and all do better with some AF microadjustment. But, if I did not do it, I would think my lenses are sharp right out of the box, and not be concerned about it. But, with testing, I see how things are improved by microadjusting and don't mind do it.
Bottom Line: When someone tells me all their lenses are sharp and they see no reason to AF microadjust them, then I know either they really don't know how sharp the photo could be with superb technique and proper AF microadjusting the autofocus, or if they run the AF microadjustment test, they do something wrong and don't see how things are improved by doing it. While it is possible to have the default value of 0 produce the sharpest focus, the odds are against it!!!!! From what I have seen with my gear, and my workshop clients gear, you have a better chance of hitting the lottery than getting two lenses where 0 is the best AF microadjustment choice.


Metering
It is a cloudy day, but some areas under the trees are darker than other nearby spots more in the open so the ambient light is changing over a stop range. If the ambient light was consistent, I would use manual exposure, but due to its variability, I prefer to use an automatic exposure mode along with the exposure compensation dial. By far, the best auto mode I know for this situation is Auto ISO, manual aperture and shutter speed, along with exposure compensation. I assign EC to the SET button to make it easy and fast to adjust. After a couple of test shots, I found +1 EC worked pretty well as the leaves were lighter than middle tone and that tends to cause underexposure. The +1 EC (exposure compensation) increases the ISO one stop more than would otherwise be used making for brighter images. This also produced the first blinkies in the light areas and that is what I am looking for to deliver a good exposure for the large Canon RAW files I shoot, and later process with Canon's free DPP4.


I realize that depending on the surroundings - lots of light brown November leaves or darker bark - a squirrel might be in a spot where +1 EC isn't perfect, but it is always going to be close, so I left it there. Digital RAW files offer much leeway when it comes to exposure, so I don't worry about it too much. I know I am always with 1/2-stop of ideal and that is really close enough.
Focusing
I prefer continuous autofocus (for the squirrels, but not for everything) assigned to the AF- ON button found on the rear of the camera to the right of the viewfinder. By holding the AF - ON button down, the camera continuously adjusts the autofocus for the area where I have a single AF point on and active. For example, with a squirrel perched on a branch, I compose the image, and then use a "joy" button on camera rear to move the active AF point over so it coincides with the squirrels face. I press the AF - ON button and the camera focuses the lens, let off the AF - ON button to lock the focus, and shoot away. If the squirrel is gradually hopping toward me, then I select a single active AF point that corresponds with the squirrels face, hold the AF - ON button in to keep the camera focusing the lens as the shooting distance changes, and press the shutter button at the same time to shoot images. That is the advantage of continuous autofocus where autofocus is not assigned to the shutter button, but to the AF-ON button. You can have continuous autofocus or lock focus instantly by pressing in on the AF-ON button for focus or let up on it to lock focus. It really works well when you are continually switching between moving subjects that suddenly become still and vice-versa.

In only two hours, I shot about 1400 images and some are posted here. I do plan to return to the park when light conditions are different. The soft light on a cloudy day is fine when the squirrel is on the ground or in a low tree where you can get a background that does not include much sky, or better, no sky at all. But, several times squirrels perched on branches that would be a fine image if the sky wasn't white. So on a sunny afternoon, I plan to return to get different light on the fox squirrels and make images of them with a blue sky background! When I do, I will post some here.

A enjoyed a sunny morning and returned to the park to make more squirrel images. Previously on a cold afternoon, I saw a dozen fox squirrels "hunting" acorns, but on this warm sunny morning, not a creature stirred. Eventually I spotted one sitting on a branch high in the tree, and it kept sitting - obviously enjoying the warming rays of sunshine. Little activity happened, but I did managed to shoot perhaps two dozen images in two hours, keeping in mind on the cold afternoon I shot 1400 images in 2 hours. So I wondered "why less squirrel activity?" I left for lunch and came back at the end of the day and found considerably more squirrels so I took more images. Finally I could make squirrel images when they were up on branches against the blue sky, but overall, the sunny day made squirrel photography more difficult as the contrast is high when sun lights parts of the squirrel and the rest is in the shadows.
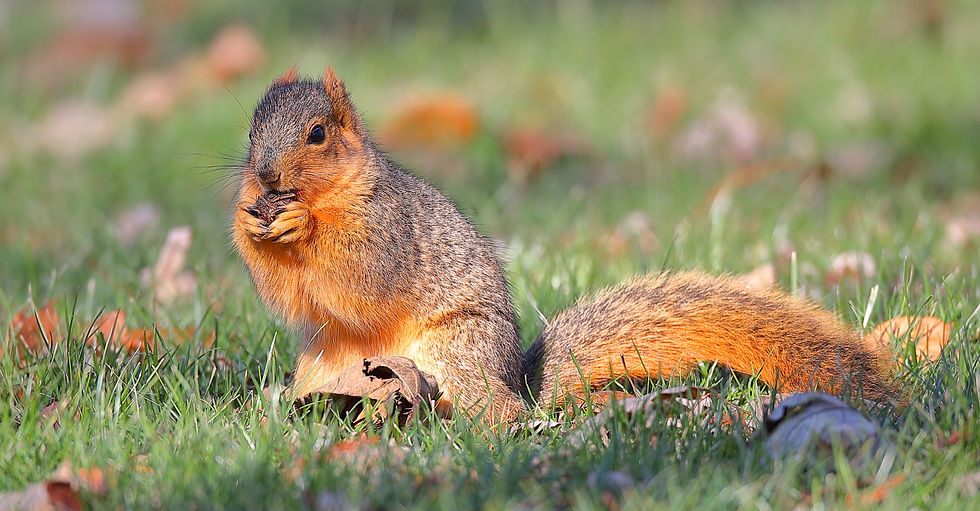
This fox squirrel is watching me, but with the working distance my 800mm lens provides, it is quite easy to approach them within good photo range.


The above two images are the same image, just cropped differently. The image with the squirrel smaller is the in-camera shot with no cropping at all. Then I cropped it tightly to really show the squirrel well. I think both crops work, the tight one to show details in the squirrel, and the one just above this that shows the squirrel in its preferred habitat - the side of a tree.

On a sunny day, the fox squirrels often stayed high on the branches to catch the warming rays of sunshine.
And not to be left out, while I have not seen gray squirrels in Seymour, I did photograph them in the Smoky Mountains just before I began teaching photo workshops there. Here are two gray squirrel images so you can compare the two squirrel species.


Endless deadlines had taken over my daily life. Love seemed distant and difficult to achieve. Despite my doubts, I arranged a meeting through Fiwfan and looked forward to the experience. The afternoon turned into something truly special. I still remember every detail with a smile.
Really helpful article with practical insights and a reader-friendly writing style throughout the complete discussion. It’s refreshing finding blogs that genuinely help readers understand topics instead of making things overly technical or difficult online nowadays. Your article stayed informative and engaging from beginning to end overall today. During my recent online research for related topics and updates, I also visited Allpanelexch Login and found interesting resources there too. Keep posting valuable and informative blog content regularly online for readers everywhere.
FIWFAN love is more than just a feeling; it is a gentle current that connects two souls. It is built on shared laughter, the secret of whispers, and the comfortable ease of a familiar hug. With each glance and touch, a deeper connection is formed, rooted in trust and mutual admiration. Through challenges and triumphs, the love of a couple remains a haven where the heart finds solace, growth, and unwavering support. It's a beautiful journey of two people in one.
Breaking down wildlife camera settings and squirrel behavior makes this deep dive so insightful, and Cabligo helps me better follow these practical outdoor photography tips.
The duty of care in the workplace is not just about avoiding accidents, it is also about promoting overall wellness. Encouraging healthy habits and providing resources for physical activity can improve the welfare of the entire team. Academic modules at The College of Contract Management advocate for these holistic approaches to workplace safety. A healthy workforce is a more productive and resilient one in the face of industry challenges.